
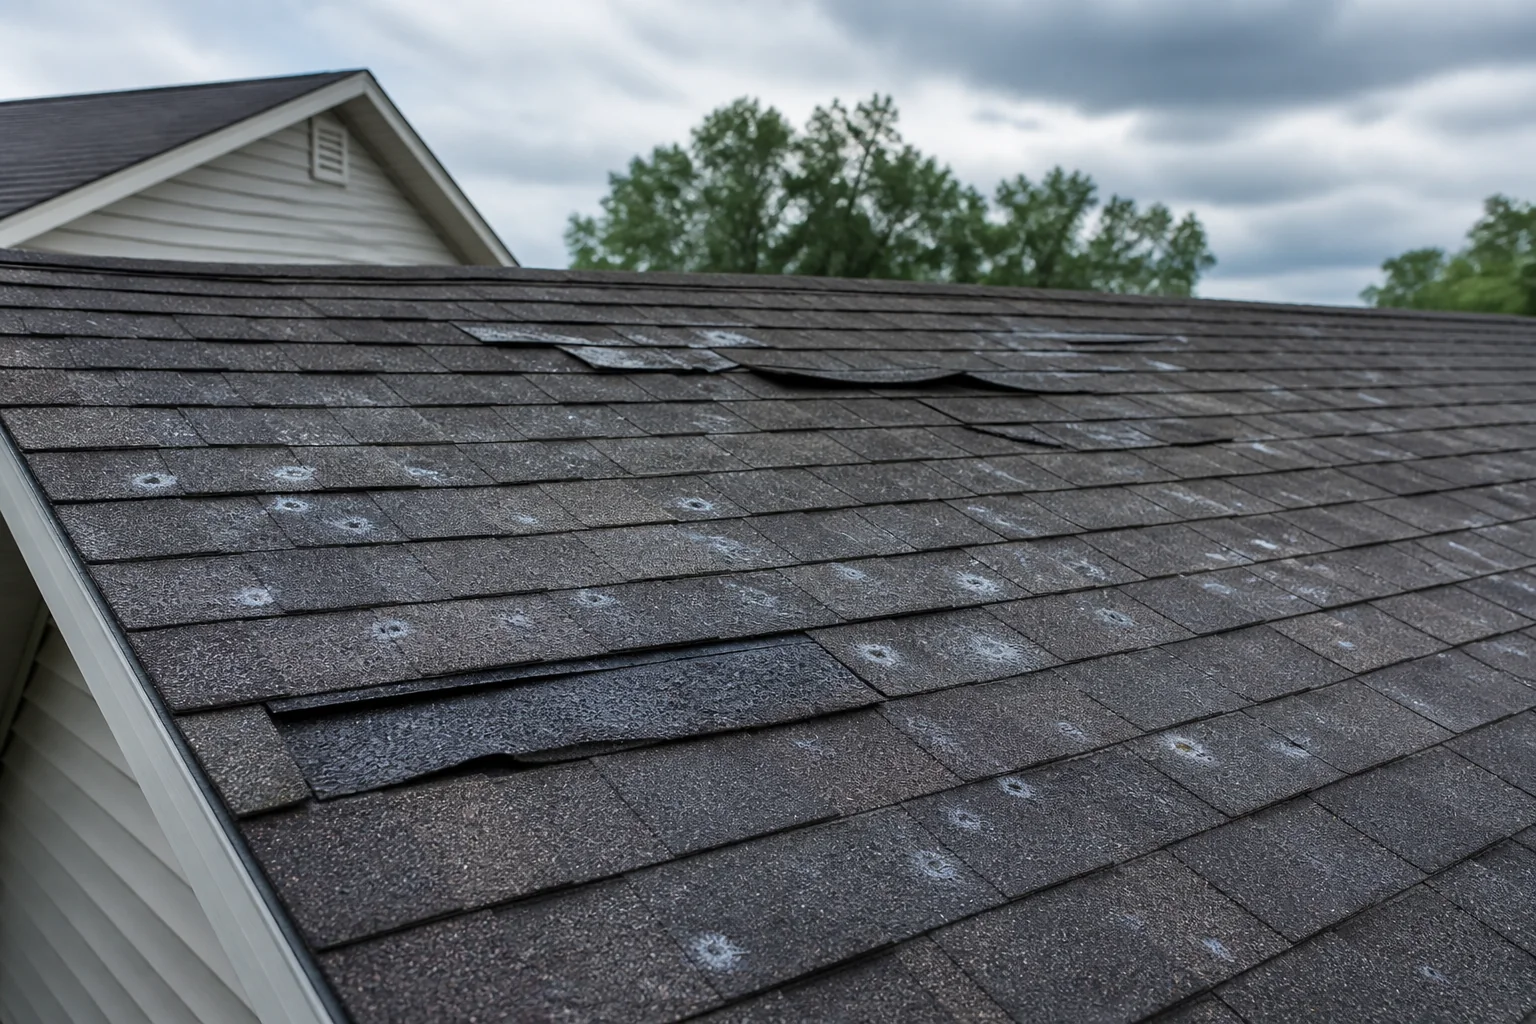
A severe Wisconsin storm can pass in minutes and leave a roof problem that takes weeks to reveal itself. Hail may bruise shingles without punching a visible hole. Wind can lift a shingle, break its seal, and let it settle back into place. A branch can crack decking beneath an apparently minor surface mark. Water may not appear indoors until the next slow rain.
The safest response is neither panic nor delay. Homeowners need to protect people, prevent additional damage, preserve evidence, and obtain an inspection that distinguishes storm damage from ordinary wear. This guide provides a step-by-step process and explains where the roofer’s role ends and the insurance company’s role begins.
First, understand what counts as severe weather
The National Weather Service defines a severe thunderstorm as one capable of producing hail at least one inch in diameter or wind gusts of at least 58 mph. Both can damage roofing, siding, gutters, windows, trees, and exterior equipment. A storm does not need to produce a tornado to create a serious roof loss.
Damage also varies from house to house. Roof slope, age, shingle condition, installation, tree cover, wind direction, and hail size all matter. Your neighbor receiving a new roof does not prove your roof is damaged, and an undamaged-looking roof next door does not prove yours is fine.
The first-hour safety checklist
Do not go onto the roof. Wet shingles, loose materials, damaged decking, nearby power lines, lightning, and unstable trees make post-storm roof access dangerous. Begin from the ground and from inside the house.
- Confirm everyone is safe and stay away from downed electrical lines.
- Look for active water near light fixtures, outlets, and the electrical panel.
- Move belongings away from leaks when it is safe to do so.
- Place containers beneath drips and protect floors.
- Photograph interior water, ceiling stains, and damaged belongings.
- From the ground, photograph each side of the house and the surrounding yard.
- Note the storm date, approximate time, hail size if observed, and wind direction.
- Contact emergency services or utilities for immediate hazards.
If a ceiling is bulging with water, keep people out of the area. Water and electricity are a dangerous combination. A contractor can help stabilize the building, but electrical or structural concerns may require the appropriate licensed professional.
What you can inspect safely from the ground
Walk the property only after the storm has passed and authorities say conditions are safe. Use binoculars or a camera zoom rather than a ladder. Look for:
- Shingles in the yard or visibly missing from the roof
- Lifted, folded, creased, or displaced shingle tabs
- Exposed underlayment or decking
- Bent or detached flashing
- Dented gutters, downspouts, vents, or metal trim
- Fresh impact marks on siding, window screens, or outdoor equipment
- Granules collected at downspout outlets
- Broken branches resting on the roof
- A sagging roof area or puncture
- Loose fascia, soffit, or gutter sections
- Water entering around chimneys, skylights, or roof-to-wall intersections
Granules alone do not prove hail damage. Asphalt shingles naturally shed some granules, especially when new or aged. A professional considers the pattern, the condition of nearby metals and soft surfaces, the shingle’s age, and whether impacts fractured or loosened the material.
Hail, wind, and tree damage leave different clues
Hail damage
Hail effects depend on size, density, wind, roof angle, and material condition. On asphalt shingles, potentially significant impacts may create a softened or fractured area, dislodge protective granules, or expose the asphalt layer. Cosmetic marks on metal are not evaluated the same way as functional damage to shingles.
Random marks can also come from foot traffic, tools, manufacturing variation, blisters, branches, or age. That is why a few close-up photographs without roof-wide context are not a reliable diagnosis.
Wind damage
Wind commonly affects edges, corners, ridges, and roof sections facing the strongest pressure. A shingle may be completely missing, visibly folded, or creased near the seal strip. Some lifted shingles settle after the storm but no longer seal correctly. Future wind or rain can exploit that weakened bond.
Wind may also loosen ridge caps, flashing, pipe boots, siding, and gutters. An inspection should follow the entire water-shedding system rather than counting missing shingles alone.
Fallen branches and debris
An impact can damage rafters or decking beneath intact-looking shingles. Watch for a new dip, cracked trim, interior drywall movement, or a branch that struck near a valley or penetration. Do not remove a large limb yourself; its weight may be stabilizing damaged material, and moving it can cause additional collapse or injury.
Prevent additional damage without destroying evidence
Most insurance policies require the homeowner to take reasonable steps to protect the property from further loss. That can include emergency tarping, removing water, or boarding a damaged opening. It does not mean completing permanent work before the carrier has a reasonable opportunity to inspect.
Ask the emergency contractor to document conditions before and during stabilization. Keep invoices, photographs, material samples when practical, and a written description of the work. Do not discard damaged items unless safety or local authorities require it. The Wisconsin Office of the Commissioner of Insurance advises policyholders to photograph damage, make lists, retain evidence, and communicate promptly with the insurer.
Temporary work should be appropriate for the roof. A tarp installed with unnecessary fasteners can create more holes. Adhesives and sealants can complicate later repairs. The goal is to stop immediate water entry with the least additional disturbance.
When and how to contact the insurance company
Read the policy and call the agent or carrier promptly when damage may exceed the deductible or when there is active water entry. Ask for the claim number, adjuster contact information, inspection process, deadline requirements, and instructions for emergency repairs.
Important questions include:
- Is the roof insured at replacement cost or actual cash value?
- Does the policy contain a separate wind or hail deductible?
- Is there a roof-surface-payment schedule based on age?
- Are cosmetic-damage exclusions present?
- Is matching coverage addressed?
- What documentation is required?
- Should damaged materials be retained?
- What is the deadline for proof of loss or supplemental information?
The Wisconsin OCI explains that covered storm damage and ordinary wear are treated differently. If a roof is worn out without a covered cause of loss, replacement is generally the homeowner’s responsibility. If a covered storm damages part of the roof, payment is governed by the policy, deductible, valuation method, and facts of the loss.
A roofer should not tell you that insurance “must buy the roof” before the carrier evaluates the claim. The contractor documents physical conditions and estimates appropriate work. The insurer interprets coverage. Homeowners should be cautious of anyone who guarantees approval or urges them to exaggerate damage.
What a professional roof inspection should include
A storm inspection should be systematic and documented. Depending on access and conditions, it may include:
- Roof slopes, ridges, valleys, eaves, and penetrations
- Shingle adhesion, creasing, impact patterns, and missing material
- Flashing at chimneys, walls, skylights, and vents
- Gutters, downspouts, siding, fascia, and soft-metal components
- Attic decking, insulation, moisture, and daylight at openings
- Interior ceilings and walls below suspected entry points
- Measurements, overview images, and close-up photographs
- Separation of storm-related conditions from maintenance or age
The report should explain what was observed rather than merely display circles drawn around roof marks. Context matters: which slope, how many test areas, what collateral evidence, and what failure mechanism connects the mark to reduced performance?
If an adjuster schedules a roof inspection, homeowners may ask whether their contractor can attend. The contractor can provide access information, measurements, photographs, and repair considerations. The adjuster remains responsible for the carrier’s evaluation.
Repair, partial replacement, or full replacement?
Not every storm-damaged roof needs complete replacement. A localized repair may be appropriate when damage is confined, matching material is available, surrounding shingles remain serviceable, and flashing and decking are sound.
Replacement becomes more likely when damage is widespread, shingles cannot be repaired without breaking adjacent material, the roof has multiple affected slopes, or the existing assembly is near the end of its useful life. Code requirements, manufacturer instructions, material availability, and the ability to integrate new work also matter.
The right scope is based on restoring a reliable roof—not maximizing the size of the claim. Riley’s Roofing can explain the construction options and provide a written estimate for storm-damage roofing work. For claim documentation and adjuster coordination, see the company’s Wisconsin roof insurance claims service.
Contractor warning signs after a major storm
Storms attract legitimate contractors and opportunistic crews. Slow down before signing. Warning signs include:
- High-pressure, same-day contract demands
- Promises to “waive” or hide the deductible
- Guaranteed insurance approval
- Requests to sign over all insurance proceeds
- Vague scope descriptions without materials or quantities
- No verifiable Wisconsin contractor credentials
- No proof of liability insurance
- Large cash payment before materials or scheduling
- Refusal to provide a physical business identity or references
- Instructions to report damage that was not observed
Verify credentials through Wisconsin’s licensing resources, read the cancellation terms, and understand any authorization you sign. An inspection agreement, contingency agreement, and construction contract are not necessarily the same document.
Build a claim file that stays organized
Create one folder—digital or paper—with:
- Policy and declarations page
- Claim number and contact log
- Storm date and weather notes
- Before-and-after photographs
- Contractor inspection report
- Adjuster estimate
- Emergency invoices
- Repair or replacement proposals
- Emails, letters, and text summaries
- Material selections and warranty documents
- Mortgage-company requirements, if applicable
After each important phone call, write the date, person’s name, and next step. If there is disagreement, ask for the position and policy basis in writing. Wisconsin OCI accepts consumer complaints when a policyholder cannot resolve a problem with the company, but start by communicating clearly with the insurer or agent.
The 30-day post-storm checklist
Even if no immediate leak appears, continue watching the home:
- Check the attic after later rains.
- Watch for new ceiling spots or odors.
- Confirm temporary coverings remain secure.
- Keep gutters and downspouts flowing.
- Review the written inspection and estimates.
- Complete approved repairs before temporary measures fail.
- Store final photographs, invoices, and warranties.
Delayed symptoms do not automatically prove storm causation, but prompt documentation makes the timeline easier to understand. A small opening can produce much larger interior damage over time.
Sources and review information
- National Weather Service: Severe Thunderstorm Safety
- Wisconsin OCI: After a Storm Hits
- Wisconsin OCI: Settling Property Insurance Claims
- Wisconsin OCI: Homeowners Insurance FAQ
This guide was prepared for Wisconsin homeowners and reviewed for Riley’s Roofing, a licensed and insured roofing contractor based in Monroe, Wisconsin (WI contractor license 4742-DCFR). It is general education, not legal or insurance advice. Policy language, damage, code requirements, and claim decisions vary.